

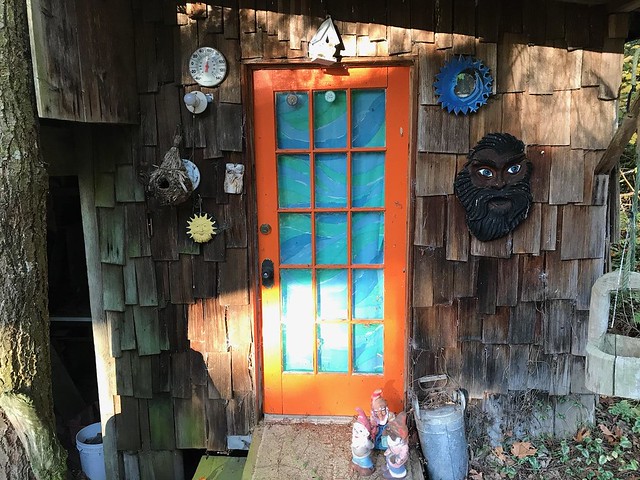
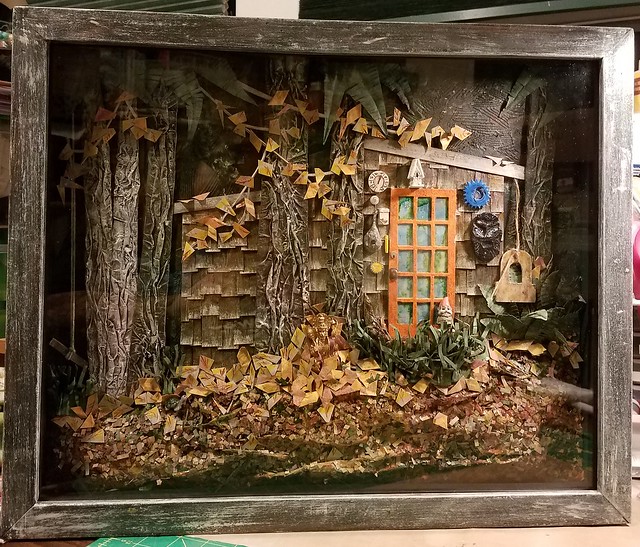
This little cabin in the woods sits right next to my dad's house, about 100 feet away. He built it when I was a very small child, to live in while he built the "big house." Until I was in 6th grade I lived with my mother full time, so I only spent the summers here with my dad. He lived in this tiny space for a long time. The main space with the orange door is only about 10 feet by 12 feet, and the attached building on the left was the kitchen. It is open on one side to the elements, so not livable space. To the left of the turtle and down the hill was the outhouse! To the right of the far right tree is a large fire pit where most of the cooking was done. The main space was one room with a potbellied wood stove, a telephone and electricity. My dad slept in a loft style bed and I had my bed underneath, with a couple of shelves and 2 dressers. That was it. It wasn't until I was 10 years old or so that the had the big house finished enough so that he could move in. Even then it was a tub with visqueen clamped around it for showers, raw lumber for counters and shelves in the kitchen, and flooring that moved under your feet because it wasn't secured down yet.
Even though I lived with my mom, I consider this my childhood home. She moved around a lot with me in tow, but I always returned here. It was consistent and always there. Just like my dad. I wanted to make something that would show him how much I appreciated that.
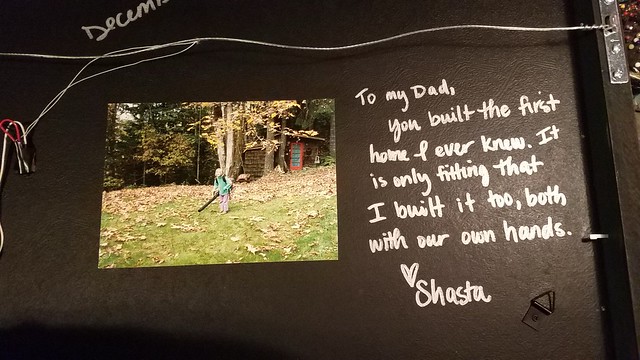
I had this idea brewing in my head for years. He sent me a picture of my daughter in front of this cabin. Both of my kids were at his house for the weekend, and she had a giant leaf-blower backpack on. She was always small so it was kind of comical, and she was probably around 6. She is now 13, so I have been thinking about this for AGES. I saw this picture and immediately thought that I needed to 'build' it. Every Christmas I thought about it. I procrastinated, and then I and would run out of time. I knew that this was going to be a an intense, time consuming project and I couldn't rush. I had to take my time and be meticulous. I finally decided that this year I would do it, and began in late October. In all, I would guess that it took me about 6 weeks. I finished with a couple of weeks to spare before the holidays. I tried to take pictures of everything along the way, but now that I am putting it together here I realized a few things were left out. I guess I must have gotten so into the process, and that's not a bad thing! I made absolutely everything by hand, with the exception of 2 miniatures that I purchased at Michael's, and 2 others I ordered online. The tiny turtle and gnome came from Michael's, the light bulb and Buddha came from the world wide web. I know Buddha isn't the right word, but I don't know the actual name for the statue.
So here it is. This has been known my whole life as simply "The Cabin." It was a guesthouse for a while, and my dad's friends would stay in it when they visited. In high school I decided I wanted to live in it for 2 years, because it was like a place all of my own. It was cool, however this property is almost 30 miles outside of town, and the house is up and old logging road. There was literally nowhere for me to go. By the time I could drive, I had to walk from the cabin around to the front of the big house to where the cars were parked. There was no sneaking out of this place easliy! I also stayed in here the night before my wedding with 3 great friends, since I got married on the property the next day. I was 21 years old and we giggled like little girls.
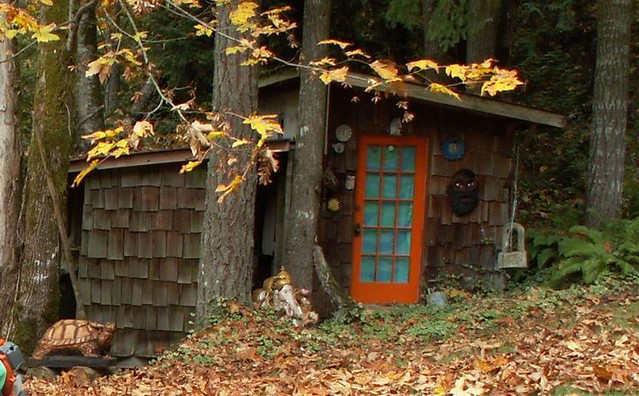
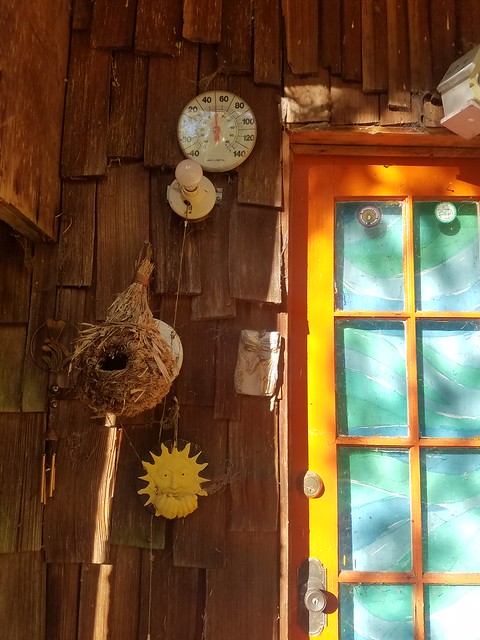
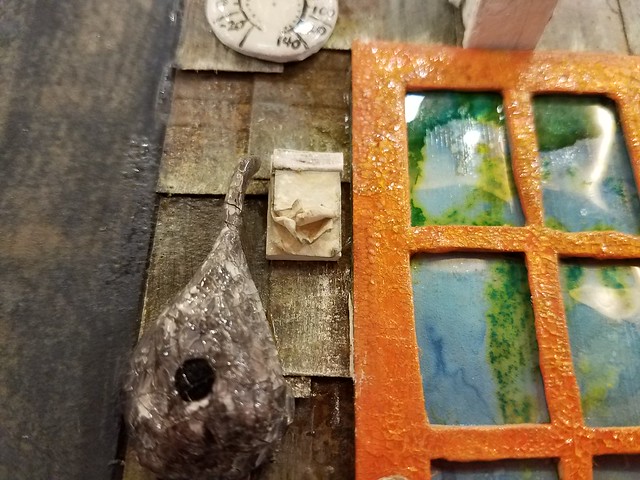
It has acquired some decorations over the years. However, the light bulb, the memo pad and the thermometer have been there forever. The notepad was how people that stopped by let us know that we missed them, if we weren't home. It is gone now, but there used to be a carpenter's pencil hanging next to it. You know those wide, flat ones that were always carved to a point by a knife? I snuck over and peeked at it last summer, to get a close up of the small details. The paper is worn and crumbly, but I lifted up a few sheets gently and there is a note from a childhood friend of mine dated sometime in 1986. I would have been about 10 or 11 years old. I don't recall when the door was painted orange, but I do remember that it used to be white. The blue/green fabric inside the windows is an old bed sheet from the 70's. There was no light switch, just the pull chain on the outside.
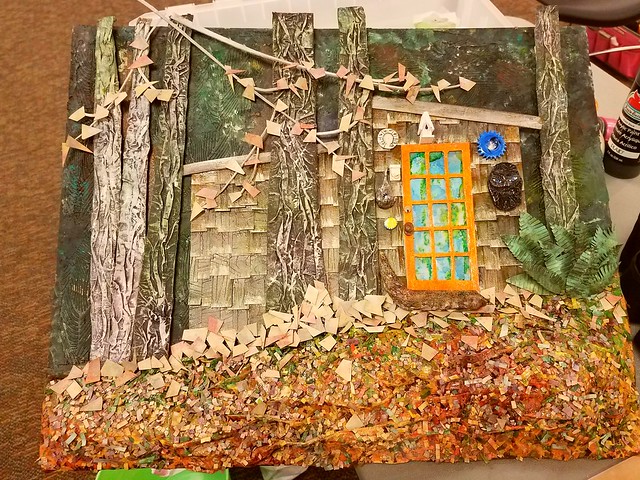
I changed directions a few times, and didn't quite know where to start. I began by cutting a piece of foam board to 16" x 20". I chose that size because I wanted a standard sized shadow box frame to put this in, and that seemed not to big and not too small. I looked at mounted canvas first, but decided it was going to be too bulky to not be protected by glass. I didn't want any of the 3-D pieces to get broken off by someone trying to clean or dust it if it was left uncovered. I didn't really measure anything, I just sketched out in pencil about how big I wanted to actual house to be, and painted around it. I used plain acrylic craft paints for everything in this project. I first thought only the cabin was going to be 3-D, so this was my first background.
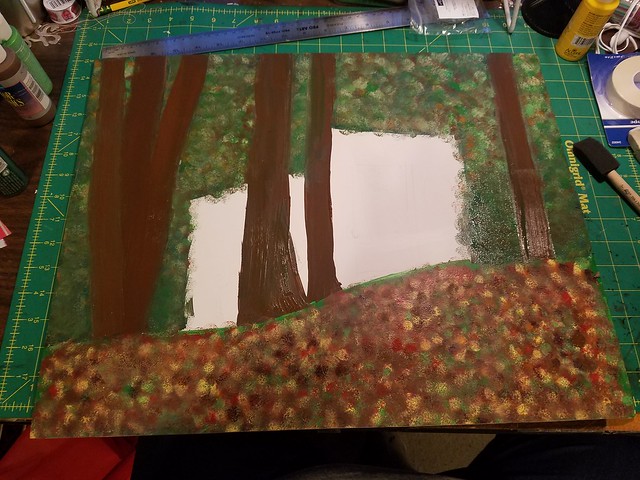
I cut the basic shapes of the trees out of chipboard.
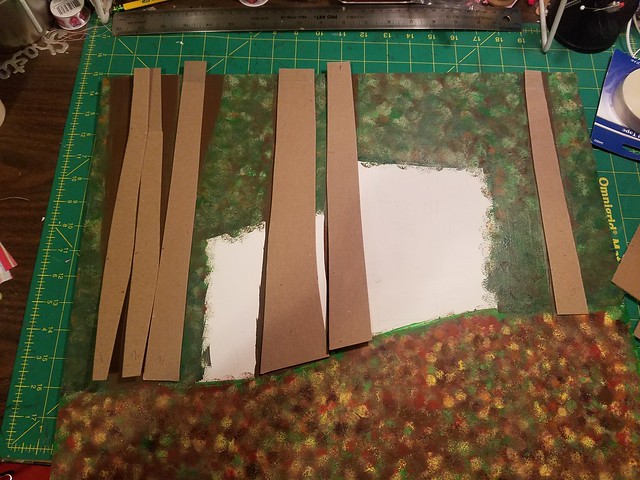
Then I used Mod Podge to adhere crumpled up paper lunch bags and wrapped the edges around the back.
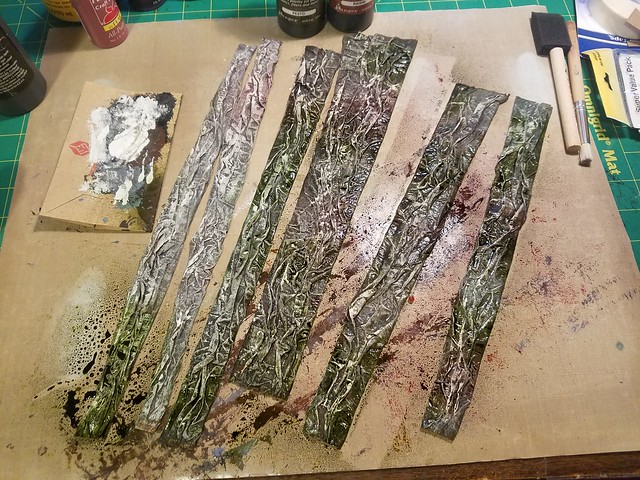
These I also changed directions on a few times. I started by painting them all brown, and then dabbed lighter and darker brown on them. When they were dry, I used a dry bristle brush and went over them heavily with white paint. After that was dry, I sprayed them with some Ranger color washes.
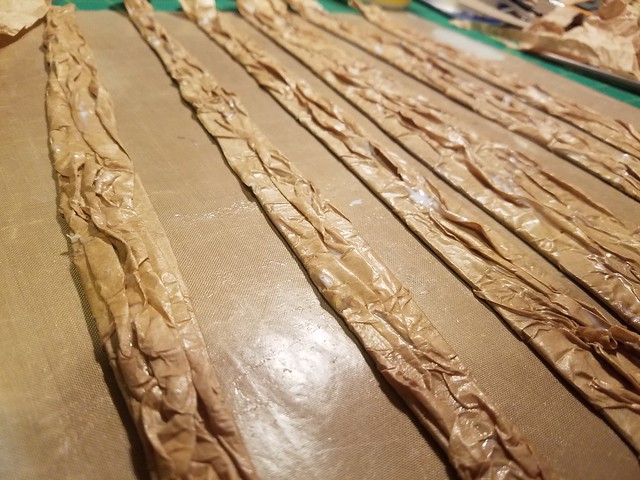
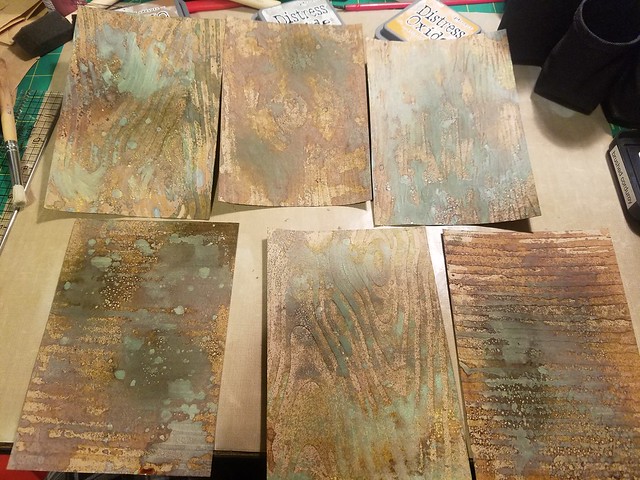
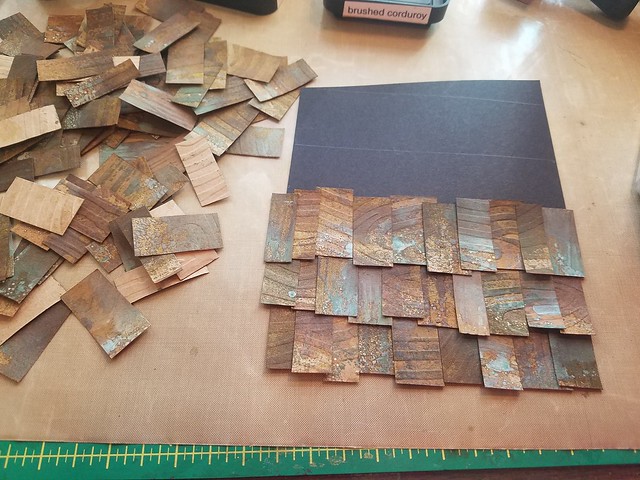
I set those aside and started on the shingles for the cabin. This is what I had built this whole idea around. My first thought was to make them out of paper and it went from there. I started with some sheets of kraft cardstock and ran them through a few different embossing folders for the texture. Then I got out my Tim Holtz Oxide Inks. I hadn't played with them yet and thought this would be the perfect first project. The shingles were old and worn, and the oxidized look would be perfect. I put down a few different colors of brown, green, and gray on my craft sheet, and spritzed them with water. I dragged the paper across the pools of ink and water, and dried them with a heat tool. I did this a few times with each sheet until it got the look I desired.
I cut them into strips and then into individual pieces. I inked the edges with more color to darken them a bit.
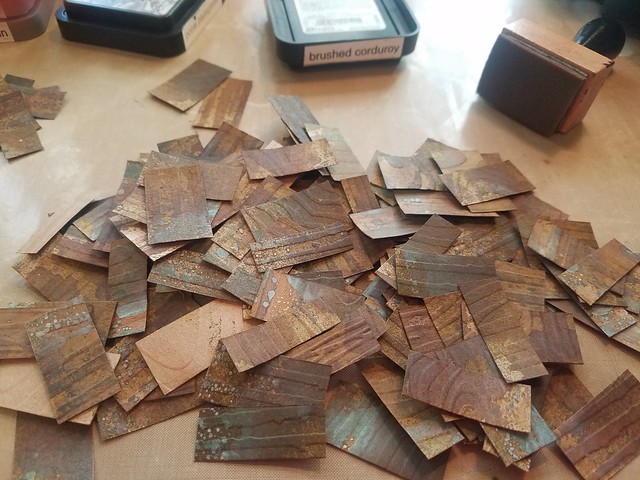
I cut two pieces of black cardstock to act as the base for the cabin, the main space with the orange door and the attached kitchen. Then started layering the 'shingles' on.
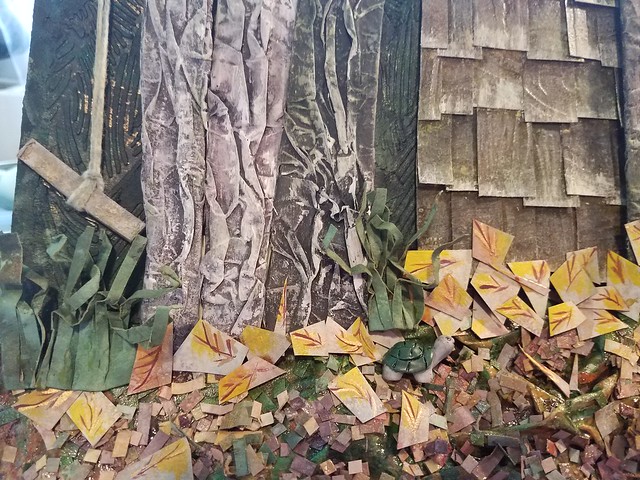
I also needed to make some foliage. I wanted to make ferns for the ground and branches for the overhead trees. I started with more kraft paper, and this time used a whole mess of green and brown inks.
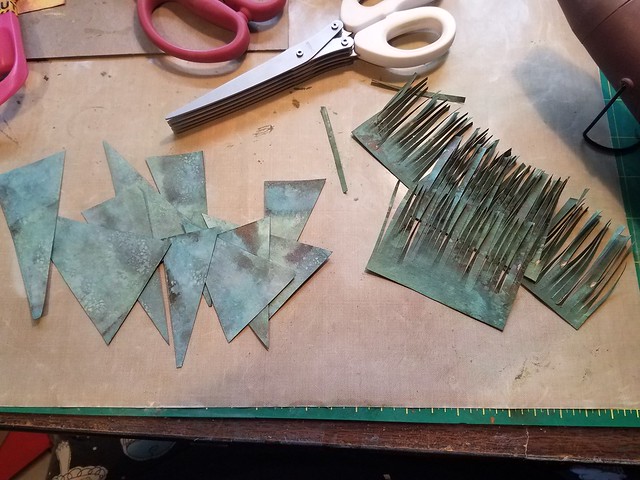
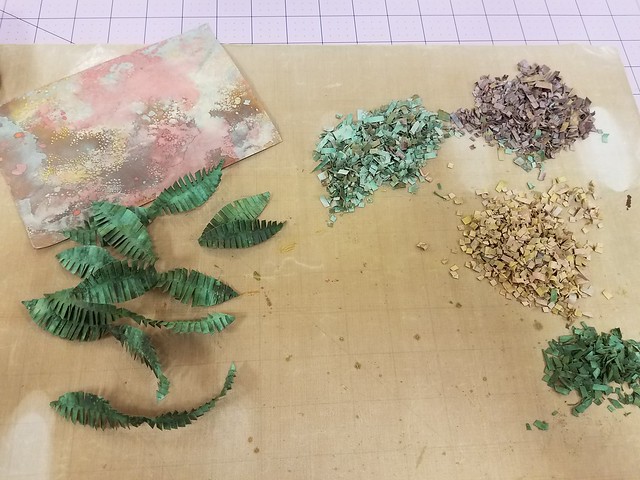
I also needed leaves for the whole foreground. I used 6 card sized sheets of kraft cardstock, with fall colors. I used the same technique as the green, by splotching colors on to the craft sheet with water and drying it between layers of color. I used the Martha Stewart fringe scissors to cut everything up into tiny pieces.
Originally I was going to have the ground be flat and only the cabin dimensional, but I changed my mind. I used more paper lunch bags to create the ground, and stuffed it with cotton balls. Mod Podge over it was to help stiffen it up. After that was dry, I sponge painted it with acrylic paint in fall colors, orange, red, yellow, green, and brown. I knew it was going to be covered up with the leaf confetti, but just to ensure no brown paper showed through.
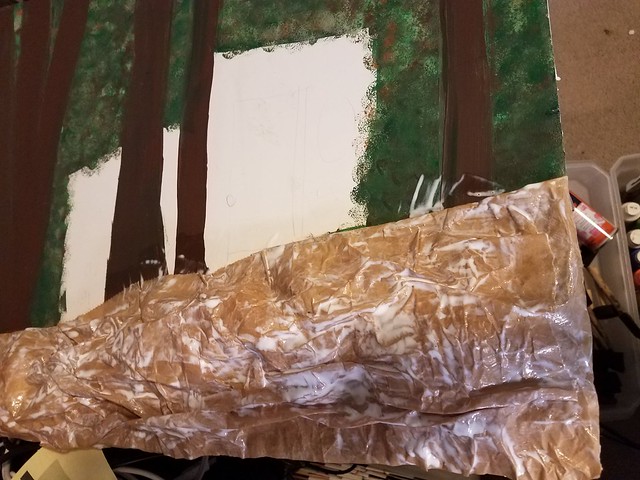
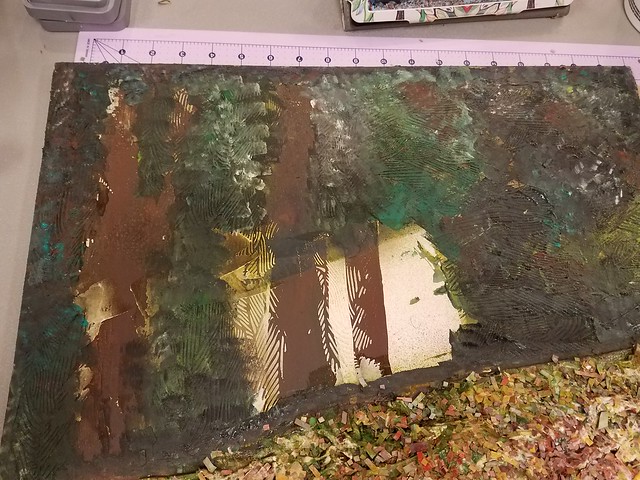
I also changed my mind for the upper background. Since the bottom was so dimensional, I decided the rest needed to be as well. I used a leafy stencil and embossing paste to cover where the cabin wouldn't be, and then went over it again with more greens and browns. I added a few splotches of black and turquoise in there too, as well as some white near the top. I was much happier with this textured background!
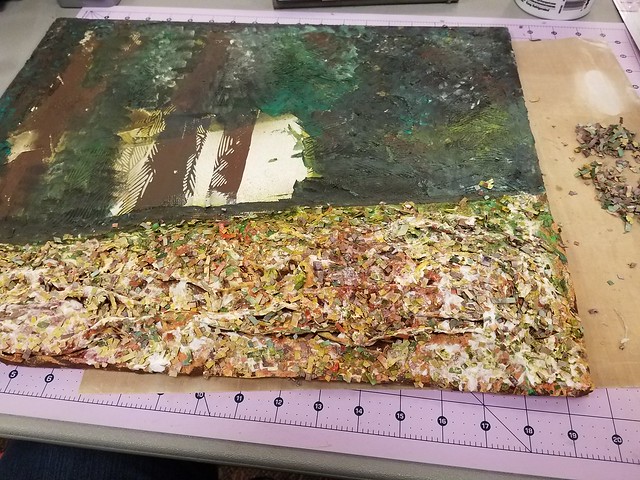
I used Mod Podge to stick all of the leaf confetti on, and when it was dry I went over the top with another coat. Some came off with the sponge brush, but most of it stayed on.
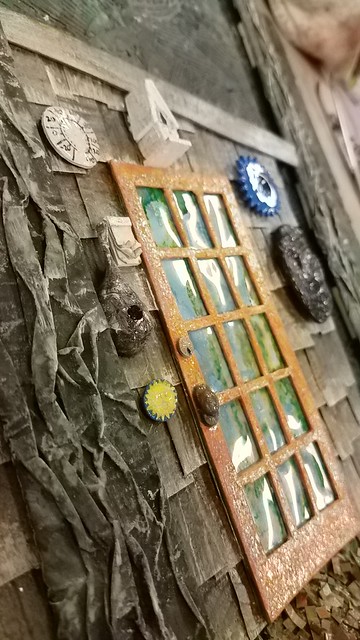
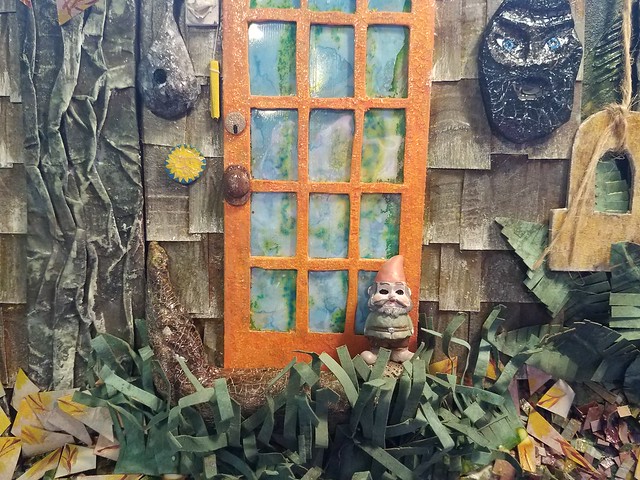
So here is a close up of all the decorations on the front of the cabin. I went to my dad's house for Thanksgiving and snuck out to take this! He asked me what I was doing and I told him to mind his own business, ha!
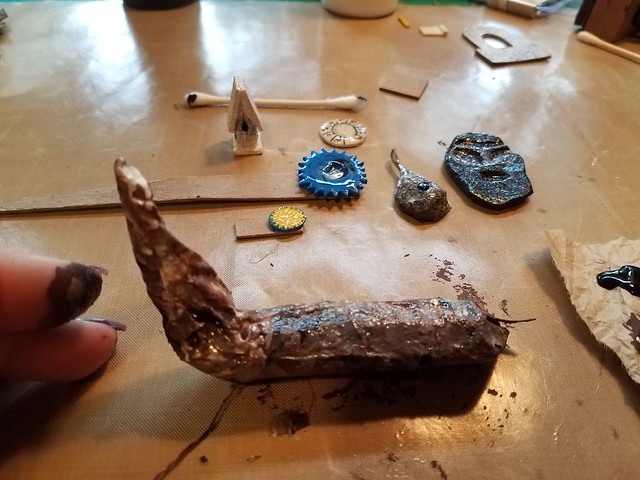
I began with the little fun pieces. Most people were like omg I couldn't do that, but it was fun! I really enjoyed the detail work. Everything was a piece of chipboard I cut out with a craft knife or scissors and painted with acrylic paint. Some of the details were so small that I just replicated them the best I knew how. I made this little moon mirror by adhering a piece of aluminum foil on the back and covering the paint with Glossy Accents.
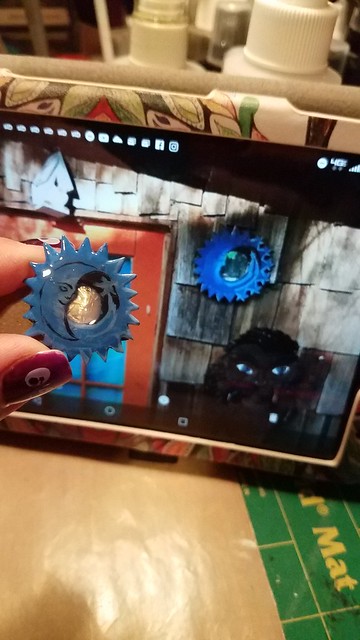
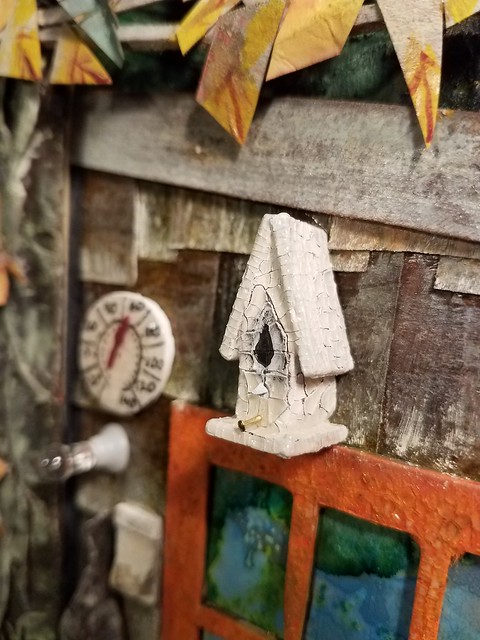
The little bird house is chipboard pieces glued together and painted white, with clear crackle paint on top. The log is a piece of chipboard I rolled into a tube, and then covered with lunch bag paper. The end it twisted up, and then I covered it in Mod Podge and then clear crackle paint. The sun and the thermometer are circles of chipboard and painted the same way, paint, then crackle glaze. I made two versions of the thermometer because I wasn't happy with the first one. I used an extra fine point black pen on the second for the lines and numbers, which turned out much better. The little brown bird's nest is a twist of lunch bag paper, and the face was a single layer of chipboard with another layer for the brows and facial features sealed with Mod Podge. I then put a layer of lunch bag paper over the whole thing and more Mod Podge, and then painted it.
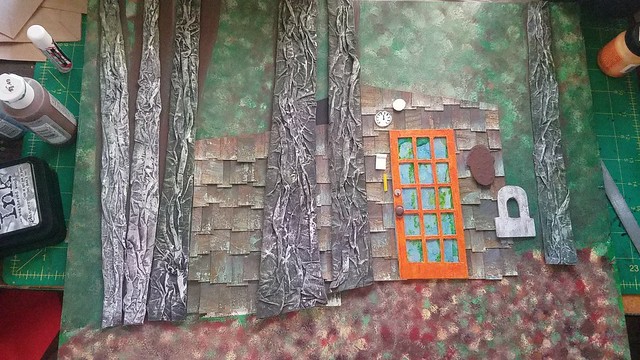
This layout was just trying all of the pieces together once they were done, to see how they were fitting together. The door was my favorite piece to make, besides the shingles. It is a piece of chipboard, and I used a pencil and ruler to measure out all of the windows to cut out with a craft knife. It has two layers of orange paint to make it super bright, and 2 layers of crackle to make it extra textured. The piece of paper behind it is a couple of colors of Tim Holtz inks because I couldn't find the right color of blue paint, and a piece of acetate to make the 'glass'. The door knob is an oblong piece of chipboard and a large brad. I painted them brown and then used a bronze colored Glimmer Mist to make it look rusty. The key lock is also chipboard painted gold. This also has the first thermometer, which I discarded. The memo pad isn't quite finished here either, I added a few tiny pieces of paper that were curled up at the edges. The little yellow pencil is there, but later I added a piece of white thread to have it dangling down. This is also my first version of the face, but ended up redoing that as well. Here you can also see a little oops.. I forgot to cover that little section of black cardstock smack in the middle between the trees. I fixed it later, but didn't even notice at the time.
Here is the finished notepad and the second thermometer and face.
I also ended up going over the shingles with Mod Podge to make them more durable, and to darken them a bit. I also dry brushed the bottoms with white paint to distress and weather them more.
This is when I started putting it all together permanently . I cut pieces of chipboard for the branches, the roof line, added the log for the front step, and the ferns. The leaves I added individually, and then painted tiny veins on them afterwards because they needed something more. The trees are mounted with foam tape to look more dimensional, and to fit the cabin pieces behind them.
The lighting was hard to capture. I added the gnome, plant hanger on the right, and the Buddha in the middle. Plus a bit of grass in front of the steps and by the tree to the left. This is also where I finally noticed I made a mistake. This picture has an additional second roof line in between the trees, the one above doesn't. I needed to add this little tiny piece to keep the perspective right.
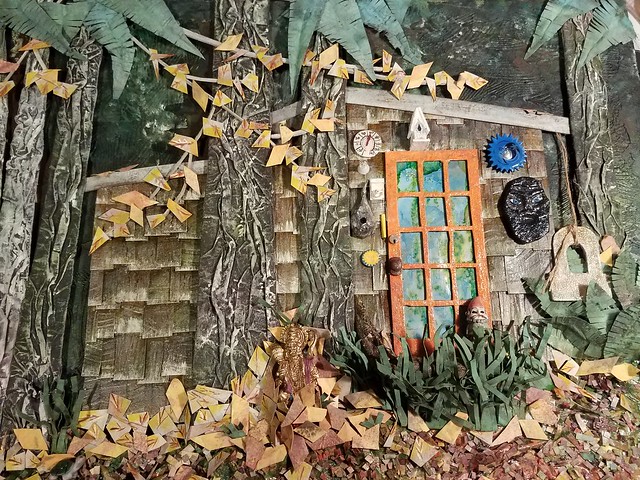

The last thing I needed was the porch light. At first, I couldn't decide what to do. I didn't want to make one, because nothing I could make by hand would look like an actual bulb, and I had a hard time finding one the right size and shape. I finally stumbled upon model train and doll house accessories, and found an actual working one! It was the perfect size, and had 2 wires to connect to a 9 volt battery. My husband and I talked about it, and we decided to have him wire a small switch to the side of the frame so it could be turned on and off easily. I also made a small pocket on the backside to slip a battery in and out, to make it easy to replace when it died.
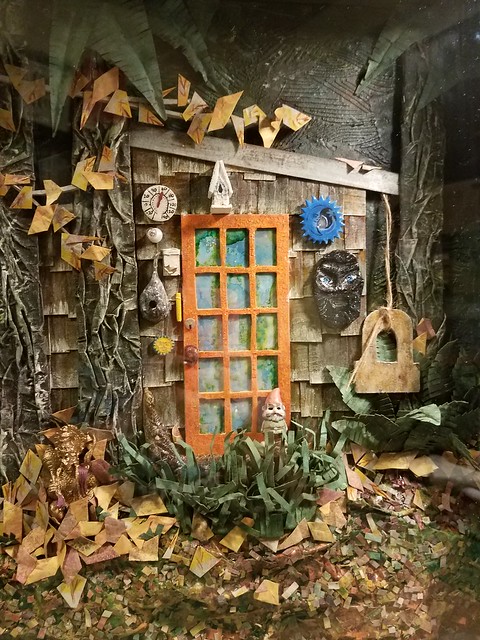
Here's a little peek of the light, seriously cool!
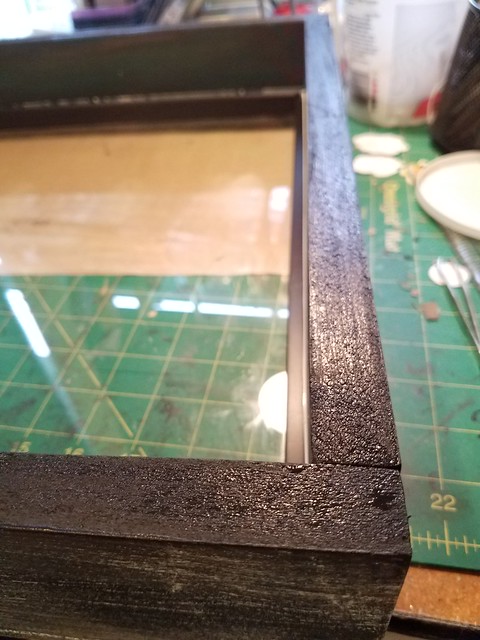
Moving on to the frame.. I purchased a shadow box frame at Michael's, but it ended up not being deep enough. With the addition of the 'ground' in the front, it wouldn't fit. I searched online and found lots of deeper options, but they were more than I wanted to spend. I kept the glass and the backing, and asked my husband to make me one. It was perfect, and sturdier than the one from the craft store. I wanted it to be textured and match the rest of this project, so I painted it. I started out with a brown base coat. I did it kind of haphazardly, letting a little bit of the wood show through.
Then I roughly sponge brushed a bunch of different colors over the top of that. Various shades of green, brown and black. Over that, I dry brushed some white paint to weather it a bit. I left the inside of the frame dark, to match the background of the 'woods'.
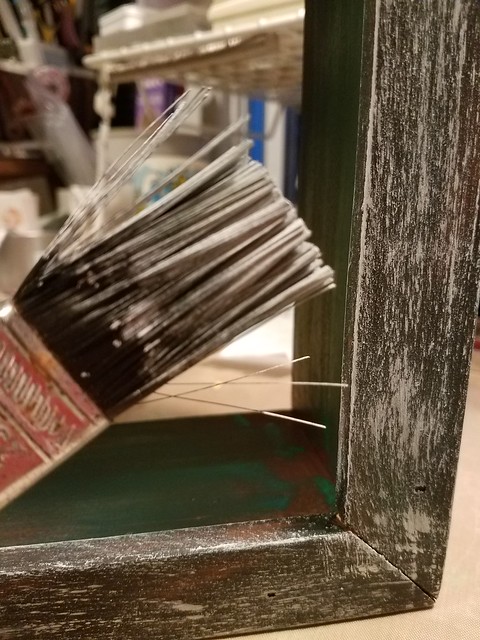
I went over it with 2 coats of clear crackle glaze.

This little piece was an added bonus. The light bulb came with this little tiny nail that I didn't end up using. I found the perfect home for it, as the perch on this itty bitty bird house.
This is the back of it. I took it back to Micheal's and had them put the hanging wire and hardware on the frame for me, it only cost me $5. I wanted to write something on the back, and also showcase the photo that inspired this whole project. I stewed over it for a few days and finally came up with something short that conveyed my thoughts.
So here is the finished project in it's entirety. It was truly a labor of love, and I thoroughly enjoyed every minute of it. It turned out better than the image that was in my head, and I am so proud of it.
And he loved it.


No comments:
Post a Comment